Hardscaping Ideas for South Dakota Backyards: Patios, Retaining Walls, and Fire Pits Built to Last
A well-built patio or retaining wall can transform a backyard from a patch of grass into a true extension of your home. But turning those hardscaping ideas into a reality that lasts is a different challenge altogether, especially here. In eastern South Dakota, the ground is not your friend, and our weather has a way of undoing sloppy work in just a season or two. This guide is about doing it right the first time.
Why This Matters in South Dakota
Building anything to last in the Sioux Empire means understanding two things: our soil and our seasons. Most of us are sitting on a thick layer of heavy clay soil. When it gets wet, it expands. When it dries, it shrinks. This constant, powerful movement puts immense stress on anything sitting on top of it. Now, add our famously brutal freeze-thaw cycles. We don't just have one hard freeze in the fall and one thaw in the spring; we can experience over 100 of these cycles in a single year as temperatures dance above and below 32 degrees.
Each time water in the soil freezes, it expands by about 9 percent, pushing everything upward in a process called frost heaving. When it thaws, the soil settles back down, but rarely in the exact same way. Without a proper foundation, this relentless cycle will lift, shift, crack, and destroy a patio, walkway, or retaining wall in short order. This isn't an exaggeration; it's a guarantee. That's why the most important part of any hardscape project isn't what you see on the surface—it's the several tons of engineered base material hiding underneath. Cutting corners on the base to save money is like building a house on a foundation of sand. It might look good for a season, but failure is inevitable.
The Unforgiving Foundation: Base Preparation Done Right
We could talk for hours about hardscaping ideas, colors, and patterns, but none of it matters if the base fails. In our 50 years of business, we’ve seen more failed projects from poor base preparation than all other causes combined. It’s the single most critical factor for longevity in our climate. A properly executed base serves one primary purpose: it creates a stable, well-drained layer that isolates your hardscape from the volatile clay soil and mitigates the destructive force of frost heaving.
Base Depth and Material
For a standard paver patio or walkway in eastern South Dakota, the absolute minimum depth for your excavated base is 8 inches. For a driveway that needs to support vehicles, you’re looking at 12 to 18 inches. We see DIY guides and even some "professionals" suggest 4 to 6 inches. That might work in Georgia, but here, it’s a recipe for a wavy, heaved mess within two years.
The material used is just as important as the depth. You don’t fill this hole with dirt or sand. You need a properly graded aggregate, often called "Class 5" or "modified gravel." This is a mix of crushed rock of various sizes and fine particles. The angular nature of the crushed rock allows it to lock together under compaction, creating a strong, stable platform. The fines help fill the voids, but it’s crucial that the mix still allows water to drain through it.
Compaction and Geotextile Fabric
You cannot just dump 8 inches of gravel in a hole and call it good. The base must be built in "lifts." We lay down 3-4 inches of aggregate, rake it level, and then compact it with a heavy-duty plate compactor until it’s iron-hard. We repeat this process, lift by lift, until we reach the final required depth. Proper compaction is what gives the base its strength and prevents future settling.
Before the first layer of gravel even goes in, we always lay down a layer of geotextile fabric. Think of this as a separation barrier. This woven or non-woven fabric is laid across the bottom and up the sides of the excavated area. Its job is to prevent the expensive, clean aggregate base from mixing with the mucky clay soil below. Without it, the clay will eventually work its way up into your base, clogging its drainage channels and compromising its stability. It’s a relatively inexpensive material that adds decades to the life of your project.
Patios: Pavers vs. Poured Concrete vs. Natural Stone
Choosing the surface material for your patio is where your personal style comes into play, but practical considerations for our climate are paramount. Each option has distinct advantages and disadvantages in the battle against South Dakota weather.
Interlocking Concrete Pavers
Pavers are often our top recommendation for patios in this region. Their biggest advantage is flexibility. A paver patio is a system of many small, individual units. When the ground inevitably moves, the tiny gaps between the pavers allow the entire surface to flex and shift slightly without cracking or breaking. If an area does heave significantly due to an unforeseen issue (like a broken sprinkler line), it’s a relatively simple process to lift the affected pavers, repair the base underneath, and relay them. You can't do that with a giant slab of concrete. Modern pavers come in a staggering variety of shapes, colors, and textures, from classic brick looks to styles that mimic natural slate or cobblestone. Their primary downside is the upfront cost, which is typically higher than poured concrete due to the labor-intensive base preparation and installation.
Poured Concrete
Poured concrete is a common choice, largely because it’s often perceived as the cheaper option. A basic concrete slab can indeed be less expensive than a paver patio. However, in our climate, concrete has one major, unavoidable flaw: it cracks. Control joints—those lines cut into the surface—are designed to *control* where the cracking occurs, not prevent it. With our extreme temperature swings and active soil, cracks are not a matter of if, but when and where. Stamped concrete can provide beautiful patterns, but a crack running through an intricate design is difficult and often impossible to repair invisibly. De-icing salts can also cause surface damage called spalling, further degrading the appearance over time. Concrete can be a viable option, but you must accept the high probability of cracking.
Natural Stone
Natural stone, like quartzite, bluestone, or limestone flagstone, offers an unmatched, timeless beauty. Each piece is unique, creating a surface with incredible character. Stone is exceptionally durable and stands up well to freeze-thaw cycles. The main barrier for most homeowners is cost. Natural stone is the most expensive material, both in terms of the stone itself and the highly skilled labor required to install it properly. Fitting irregular shapes together is a true art form and takes significantly more time than laying uniform pavers or pouring concrete. Furthermore, the base preparation must be just as meticulous as it is for pavers to prevent the heavy stones from shifting and creating dangerous trip hazards.
Essential Hardscaping Ideas: Building Retaining Walls That Won't Fail
Retaining walls in the Sioux Empire are workhorses. They hold back tons of soil, create level terraces on sloped yards, and form raised planting beds. They also represent one of the biggest potential failures in landscaping if not built correctly. A leaning, bulging, or collapsed retaining wall is not just an eyesore; it's a serious safety hazard.
The vast majority of modern residential walls are built using Segmental Retaining Wall (SRW) blocks. These are high-strength concrete blocks engineered to interlock. The mistake many people make is thinking you can just stack them up. A successful SRW is a complete system that includes the blocks, a gravel backfill zone, drainage, and geogrid reinforcement.
Drainage is Not Optional
Hydrostatic pressure—the pressure of water-saturated soil—is the number one enemy of a retaining wall. Our heavy clay soil holds water like a sponge. If that water builds up behind your wall and has nowhere to go, it will push the wall over. Period. To prevent this, you must create a "drainage zone" directly behind the wall. We backfill the first 12 inches behind the blocks with clean, crushed rock, not the dirt that was excavated. At the base of this rock column, we lay a perforated drain tile (a flexible pipe with holes) that is sloped to daylight, carrying water safely away from the wall. This entire drainage column is wrapped in geotextile fabric to keep it from getting clogged with soil.
The Power of Geogrid
For any wall over 2-3 feet tall (and sometimes shorter, depending on the soil and what's above the wall), reinforcement is necessary. This is where geogrid comes in. Geogrid is a strong, polymer grid that gets laid horizontally from within the courses of the block back into the soil being retained. You can think of it as weaving the wall into the hillside. As we build the wall up, we will periodically lay a layer of geogrid on top of a course of blocks and extend it several feet back into the soil before burying it with compacted fill. This creates a reinforced soil mass, dramatically increasing the wall's strength and ability to resist pressure. We follow the block manufacturer's specific engineering tables to determine how often and how far back the grid needs to extend. Any wall over 4 feet in height in most jurisdictions, including Sioux Falls, requires a permit and a plan stamped by a licensed engineer.
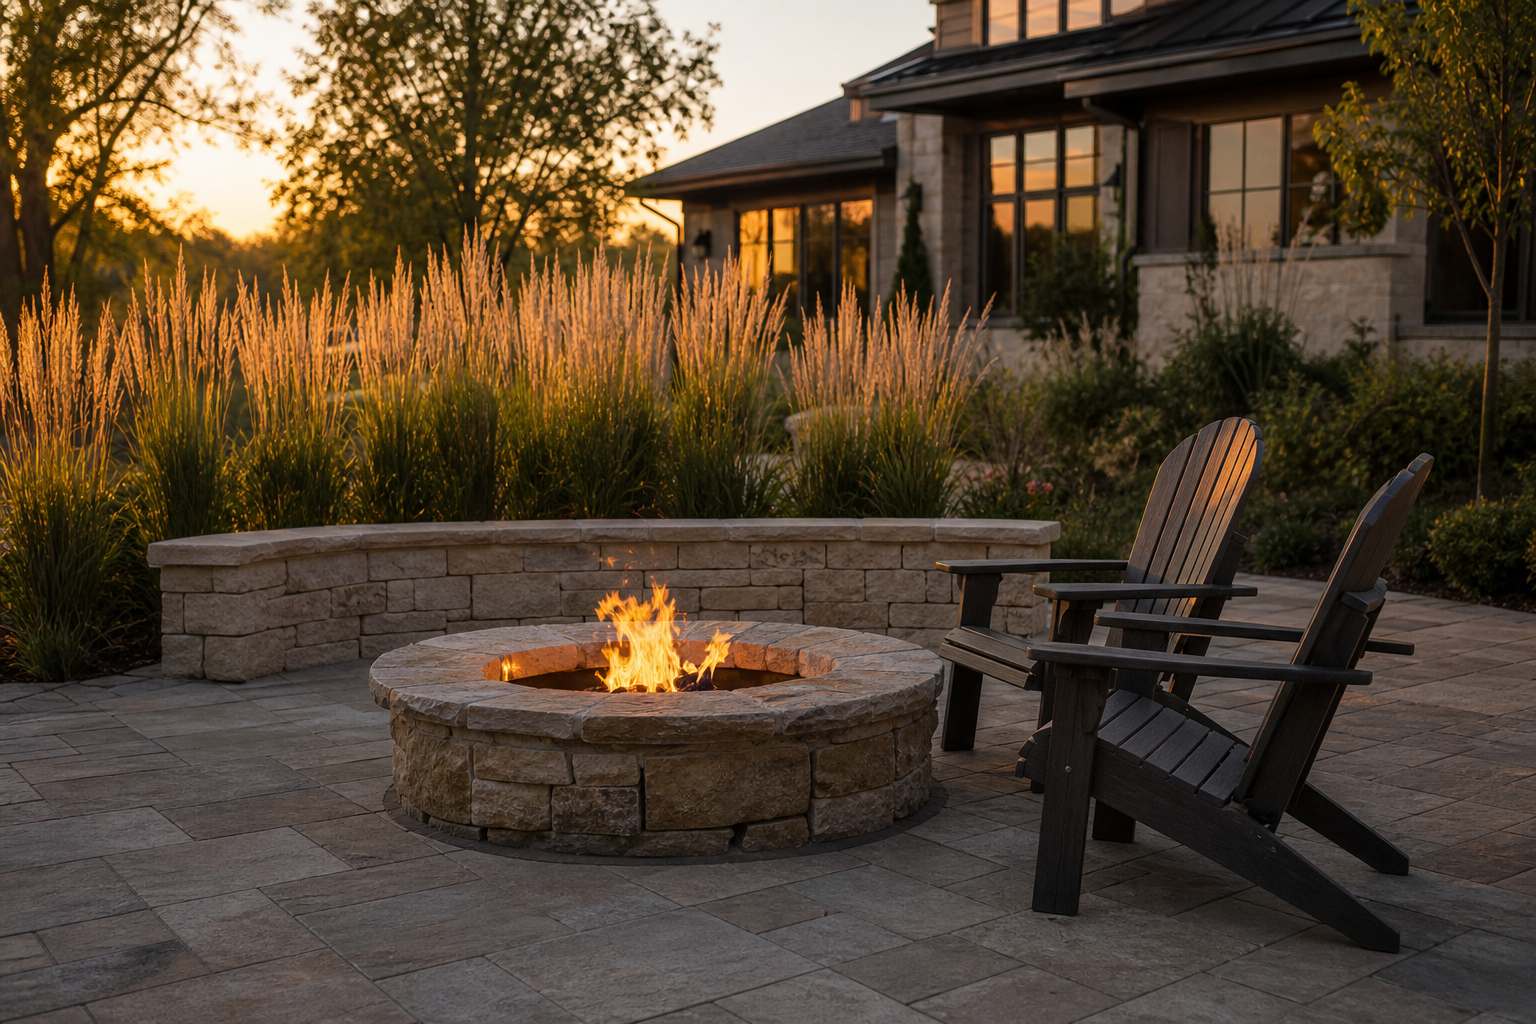
Cozy and Correct: Fire Pits Built for the Plains
There are few hardscaping ideas more popular than an outdoor fire pit. It extends the usability of your backyard well into the cool spring and fall evenings. But like everything else, a fire pit in South Dakota needs to be built with our climate and safety in mind. The two biggest considerations are the fuel source and the construction materials.
Wood vs. Natural Gas
A wood-burning fire pit provides the classic crackle, smoke, and aroma that many people love. It feels more rustic and traditional. The downside is the effort: hauling wood, starting the fire, dealing with smoke blowing in your guests' faces when the wind shifts (and the wind always shifts here), and making sure it's completely extinguished at the end of the night.
A natural gas or propane fire pit offers the ultimate in convenience. You flip a switch or turn a key, and you have instant, clean-burning flames with no smoke or embers. It's much safer around children and pets, and there's no cleanup. You lose the traditional campfire experience, and the installation is more complex and expensive, as it involves running a gas line by a licensed plumber. Before you decide, check local ordinances. Many cities, including parts of Sioux Falls, have regulations on open wood burning, including setbacks from structures and property lines (often 15-25 feet). Gas pits typically have fewer restrictions.
Materials That Won't Explode
This sounds dramatic, but it’s a real risk. The single biggest mistake we see in DIY fire pits is the use of the wrong materials. Any rock or concrete block that is porous can absorb water. When you build a hot fire, that trapped water turns to steam and expands violently, causing the material to spall, crack, or even explode, sending hot shards flying. Never use river rock, regular landscape block, or soft brick for the inner ring of a wood-burning fire pit.
A properly constructed wood fire pit must have an inner ring made of dense, high-heat-tolerant fire brick, mortared with high-temperature refractory cement. This fire brick core contains the intense heat. The decorative outer wall, made of compatible SRW block or natural stone veneer, can then be built around this core, leaving a small air gap to help dissipate heat. For gas fire pits, the heat is less intense and more controlled, so a steel insert is often used, which can then be surrounded by standard SRW block or veneer stone without the need for fire brick.
More Hardscaping Ideas: Kitchens, Pergolas, and Walkways
Once you have a patio, you’ll naturally start thinking about how to enhance it. Outdoor kitchens, pergolas, and functional walkways are popular additions that create a more complete and usable outdoor living space. The same principles of building for our climate apply.
Outdoor Kitchens and Bars
An outdoor kitchen can range from a simple built-in grill station to a full-service setup with a refrigerator, sink, and storage. The structure, or "island," is typically framed with steel studs, which are non-combustible and won't rot. This frame is then covered with cement board and finished with a veneer of thin stone, brick, or stucco that matches your other hardscapes. The countertop material is a key decision. Granite is an excellent, durable choice that stands up well to our weather. Concrete countertops can be beautiful but are porous and prone to staining and cracking in our freeze-thaw environment unless meticulously sealed on a regular basis. Any appliances, like refrigerators or icemakers, must be outdoor-rated to handle the temperature extremes and moisture.
Pergolas and Shade Structures
The South Dakota sun can be intense and our yards are often windy. A pergola provides a sense of enclosure and partial shade, and it can define an outdoor "room" over a patio or seating area. The most critical part of a pergola is its footings. The posts must be anchored to concrete footings that extend below our frost line, which is around 42 to 48 inches deep. If the footings are too shallow, frost heaving will lift the posts, twisting and potentially breaking the structure. The design also needs to account for wind load, especially for larger structures or those with a solid roof. Secure anchoring and robust connections are non-negotiable.
Walkways That Connect
Thoughtful walkways do more than just keep your feet out of the mud; they guide movement through your yard and connect your different outdoor living areas—from the back door to the patio, from the patio to the fire pit. They should be built using the exact same base preparation methods as your patio. A 6-8 inch compacted aggregate base with geotextile fabric is essential to prevent heaving and settling. Using the same material as your patio creates a cohesive look, but you can also use a contrasting material or simple steppers to define the path. Make sure the walkway is wide enough for comfortable passage, typically at least 3 feet.
The Unseen Essentials: Drainage and Edging
Two of the least glamorous but most important components of a successful hardscape project are drainage and edging. Ignoring them is a common shortcut that leads to long-term problems. They are the details that protect your investment.
Proper water management is everything. Your hardscape surfaces—patios, walkways—should be sloped slightly to direct water away from your home's foundation. A slope of about 1/4 inch per foot is standard. But where does that water go? Simply letting it pour off the edge of the patio into an adjacent planting bed can create a soupy mess and oversaturate the soil right next to your patio's base. We often integrate channel drains at the edge of the patio or tie the downspouts from your roof gutters directly into a system of solid, buried pipes. These pipes then carry the water far away from the house and hardscape areas, releasing it at a lower point in the yard or into a storm drain where appropriate. This prevents water from pooling and undermining the structural integrity of your base.
Edging serves a simple but vital purpose for paver patios and walkways: it provides lateral containment. It’s the frame that holds the picture together. Without a sturdy edge restraint, the pavers at the perimeter will slowly creep outward under foot traffic and the stress of freeze-thaw cycles, opening up gaps between the pavers. While invisible plastic or aluminum edging secured with long metal spikes is common, our preferred method is often a concrete toe or bond beam. This is a hidden ribbon of concrete poured along the outside perimeter of the base, locking everything in place with rigid, immovable strength. It provides the longest-lasting and most durable edge restraint for our demanding climate.
Decoding a Professional Hardscape Bid
When you solicit bids for your project, you'll likely receive quotes that vary wildly in price and detail. Understanding what to look for can help you differentiate between a thorough, professional proposal and one that’s cutting corners. The cheapest bid is almost never the best value.
A quality bid is a detailed scope of work, not just a single number on piece of paper. It should clearly spell out the key factors that ensure a long-lasting project. Look for these specific items:
- Excavation Depth: It should explicitly state how many inches will be excavated for the base. As we've discussed, 8 inches is the minimum for patios here.
- Base Material and Depth: The proposal should specify the type of aggregate (e.g., "Class 5 modified gravel") and the final compacted depth.
- Geotextile Fabric: The bid should mention the use of a separation fabric between the subsoil and the aggregate base. Its absence is a major red flag.
- Material Specifications: It should list the exact manufacturer and style of the paver or wall block being used. "Contractor's choice" is not specific enough.
- Drainage Details: For retaining walls, it should describe the drainage stone, perforated pipe, and fabric system. For patios, it might detail grading and water management.
- Cleanup and Site Restoration: A good bid includes details on hauling away excavated soil, repairing any lawn damage from equipment, and leaving the site clean.
- Warranty: Look for a clear statement on the company's warranty for both materials and workmanship. A confident contractor stands behind their work.
If a bid is vague or significantly lower than others, ask questions. What is your base depth? Do you use geotextile fabric? How do you handle drainage behind a retaining wall? A contractor who can't confidently and specifically answer these questions is likely cutting corners you'll pay for later.
When to Call a Pro
Simple projects like a small, on-grade paver pad for a grill or a single-layer garden bed border can often be a satisfying DIY endeavor. If you’re willing to do the back-breaking work of proper excavation and compaction, you can have success.
However, it’s time to call a professional when the project involves significant changes in elevation, retaining walls over two feet high, complex drainage challenges, or any features requiring gas or electrical lines. Any project where failure could result in property damage or safety issues—like a collapsing wall or a heaving patio that creates major trip hazards—is best left to experienced, insured installers. We have the heavy equipment to do the excavation and compaction efficiently, the expertise to engineer solutions for our specific soil and climate, and the experience to foresee problems before they happen.
The Bottom Line
Creating beautiful, functional, and durable outdoor living spaces in eastern South Dakota is entirely possible. It just requires an uncompromising approach to what lies beneath the surface. From thoughtful hardscaping ideas that suit your lifestyle to the non-negotiable details of base construction and water management, every step matters. A well-built hardscape is a significant investment in your home's value and your family's enjoyment for decades to come. Taking the time to understand the principles of building for our unique climate is the best way to ensure that investment pays off.